Wildcard certificates from Let’s Encrypt with cert-manager and ingress-nginx on Google Kubernetes Engine
Table of Contents
- Goal
- Prerequisites
- Trying out the simple web service locally
- Deploying the app to the cluster
- Installing ingress-nginx on the cluster
- Add a subdomain record for ingress-nginx’s default HTTP backend
- Add a wildcard subdomain record for the wildcard-demo app
- Installing cert-manager on the cluster
- Verifying your cert-manager install
- Acquiring a “staging” certificate for ingress-nginx’s default HTTP backend
- Create a Google Cloud service account for managing Cloud DNS resources
- Create Issuer in ingress-nginx Namespace
- Create Certificate resource
- Use the Certificate in the default HTTP backend Ingress
- Acquiring a “staging” wildcard certificate for the wildcard-demo app
- Switching to valid Let’s Encrypt certificates
- Next steps
- Issues
Goal
The goal of this guide is to have a simple web service running on a
Google Kubernetes Engine cluster with wildcard certificates from Let’s
Encrypt and using the ingress-nginx as the Ingress controller. The
certificates will be managed by cert-manager.
Prerequisites
- Working GKE cluster
- running Kubernetes 1.10+
- Domain that you own, using Google Cloud DNS nameservers
- this guide will use example.xyz in place of a real domain
- if you have not yet configured your domain registrar for this, refer to the “Configure your domain registrar to use Google Cloud DNS’ nameservers” section below.
- Docker and the gcloud tools installed on your machine
This guide assumes you already know how to work with Pods, Deployments, Services, and Secrets on Kubernetes.
Trying out the simple web service locally
The app we’ll be using, called wildcard-demo, is available on Github
and Docker Hub. All it does is return some request and host data in
the response, which would normally be useful for apps that work with
multiple subdomains.
Pull the image from Docker Hub and run it with the following commands:
$ docker pull john2x/wildcard-demo
$ docker run -p 8080:8080 john2x/wildcard-demo
With the server running, accessing http://localhost:8080 or
http://foo.localhost:8080 should return something like the
following:
$ curl http://localhost:8080 -i
HTTP/1.1 200 OK
Server: gunicorn/19.9.0
Date: Wed, 26 Sep 2018 05:59:11 GMT
Connection: close
Content-Type: text/plain
Content-Length: 193

remote address: 127.0.0.1
x-forwarded-for: None
hostname: localhost:8080
pod ip: None
pod name: None
node name: None
Most of the information are not available since we are not in a cluster yet.
To stop the server, first find the container id of the image and then
stop it with the docker stop command.
$ docker ps
CONTAINER ID        IMAGE                  COMMAND                  CREATED             STATUS              PORTS                    NAMES
6d17c2e30642        john2x/wildcard-demo   "/start.sh"              3 minutes ago       Up 3 minutes        0.0.0.0:8080->8080/tcp   angry_leavitt
...
$ docker stop 6d17c2e30642
The source code of the app is on Github if you want to review the code before deploying it to your cluster, or if you want to build the image yourself.
Deploying the app to the cluster
Now that we’ve seen what the demo app does, we can deploy it to the cluster and access it from there.
But first let’s create a new namespace for the demo app so everything is neat and organized.
$ kubectl create namespace wildcard-demo
namespace "wildcard-demo" created
...
$ kubectl get namespace
NAME            STATUS    AGE
default         Active    20m
kube-public     Active    20m
kube-system     Active    20m
wildcard-demo   Active    1m
With the namespace ready, let’s take a look at our Deployment.
apiVersion: apps/v1
kind: Deployment
metadata:
  name: wildcard-demo
  namespace: wildcard-demo
  labels:
    app: wildcard-demo
spec:
  replicas: 2
  selector:
    matchLabels:
      app: wildcard-demo
  template:
    metadata:
      labels:
        app: wildcard-demo
    spec:
      containers:
        - name: wildcard-demo
          image: john2x/wildcard-demo:latest
          imagePullPolicy: Always
          ports:
            - containerPort: 8080
              name: gunicorn
          resources:
            requests:
              cpu: 100m
              memory: 32Mi

          env:
            - name: POD_IP
              valueFrom:
                fieldRef:
                  fieldPath: status.podIP
            - name: POD_NAME
              valueFrom:
                fieldRef:
                  fieldPath: metadata.name
            - name: NODE_NAME
              valueFrom:
                fieldRef:
                  fieldPath: spec.nodeName
It’s a fairly simple Deployment with some pod and node metadata exposed as environment variables.
Save the YAML above to a file and apply it with kubectl apply -f <file>.
Next we’ll create a Service so we can access the app.
apiVersion: v1
kind: Service
metadata:
  name: wildcard-demo
  namespace: wildcard-demo
spec:
  type: ClusterIP
  selector:
    app: wildcard-demo
  ports:
    - port: 80
      targetPort: gunicorn
      name: http
With the Deployment and Service ready, we should be able to test the app using port-forwarding. Get a pod name and run the following command:
$ kubectl port-forward svc/wildcard-demo 8080:80 --namespace=wildcard-demo
Accessing http://localhost:8080 or http://foo.localhost:8080 again
should show a similar result as when we ran the image locally, only
this time we’ll get values for the pod and node details.
$ curl http://localhost:8080 -i
HTTP/1.1 200 OK
Server: gunicorn/19.9.0
Date: Wed, 26 Sep 2018 05:59:11 GMT
Connection: close
Content-Type: text/plain
Content-Length: 193

remote address: 127.0.0.1
x-forwarded-for: None
hostname: localhost:8080
pod ip: 10.8.0.8
pod name: wildcard-demo-76dd957877-84jqb
node name: gke-wildcard-demo--default-pool-e14a69d3-br0l
Installing ingress-nginx on the cluster
Now that we’ve tested that the web service is running and accessible, let’s set up the Ingress so we can access it externally without having to do port-forwarding.
We’ll be using the ingress-nginx Ingress controller, and we defer to
the official deployment guide at
https://kubernetes.github.io/ingress-nginx/deploy. You will need to
run the commands under “Mandatory command” and “GCE - GKE”. For
reference, we mirror the commands here but it is recommended that you
visit the official page in case there have been changes to the
instructions.
$ kubectl apply -f https://raw.githubusercontent.com/kubernetes/ingress-nginx/master/deploy/mandatory.yaml
namespace "ingress-nginx" configured
deployment.extensions "default-http-backend" created
service "default-http-backend" created
configmap "nginx-configuration" created
configmap "tcp-services" created
configmap "udp-services" created
serviceaccount "nginx-ingress-serviceaccount" created
clusterrole.rbac.authorization.k8s.io "nginx-ingress-clusterrole" created
role.rbac.authorization.k8s.io "nginx-ingress-role" created
rolebinding.rbac.authorization.k8s.io "nginx-ingress-role-nisa-binding" created
clusterrolebinding.rbac.authorization.k8s.io "nginx-ingress-clusterrole-nisa-binding" created
deployment.extensions "nginx-ingress-controller" created

$ kubectl apply -f https://raw.githubusercontent.com/kubernetes/ingress-nginx/master/deploy/provider/cloud-generic.yaml
service "ingress-nginx" created
Missing ClusterRoleBinding for cluster-admin ClusterRole
If you run into forbidden errors when running the commands like the
one below, that probably means your Google account does not have the
cluster-admin ClusterRole bound to it.
Error from server (Forbidden): error when creating "https://raw.githubusercontent.com/kubernetes/ingress-nginx/master/deploy/mandatory.yaml": clusterroles.rbac.authorization.k8s.io "nginx-ingress-clusterrole" is forbidden: attempt to grant extra privileges: ...
To bind your account to the cluster-admin ClusterRole, run the following
command:
$ kubectl create clusterrolebinding cluster-admin-john --clusterrole=cluster-admin --user=john@example.xyz
Once your account has been bound, re-run the ingress-nginx set up
commands.
Testing ingress-nginx’s default HTTP backend
To verify that the Ingress controller is properly installed, we can visit the default HTTP backend that is included in the set up by visiting its LoadBalancer Service’s external IP (I have redacted the last part of the IP address).
$ kubectl get service ingress-nginx --namespace=ingress-nginx
NAME            TYPE           CLUSTER-IP     EXTERNAL-IP     PORT(S)                      AGE
ingress-nginx   LoadBalancer   10.11.244.17   35.188.164.XYZ  80:32336/TCP,443:31053/TCP   3m

$ curl http://35.188.164.XYZ -i
HTTP/1.1 404 Not Found
Server: nginx/1.15.3
Date: Wed, 26 Sep 2018 06:06:02 GMT
Content-Type: text/plain; charset=utf-8
Content-Length: 21
Connection: keep-alive

default backend - 404
What we have so far
At this point we have the following pieces working:
- Our wildcard-demo app deployed to its own Namespace, with a Service that’s accessible only via port-forwarding.
- The
ingress-nginxIngress controller (v0.19.0 at the time of writing), also deployed to its own Namespace, with a LoadBalancer Service accessible with an external IP address.
Add a subdomain record for ingress-nginx’s default HTTP backend
Before we set up a subdomain for the wildcard-demo app, we should configure one for the default HTTP backend first since it’s much simpler (being a single subdomain and all).
Configure your domain registrar to use Google Cloud DNS’ nameservers
If you haven’t updated your domain registrar to use Google Cloud DNS’ nameservers yet, this would be a good time to do so.
The exact steps will be different for each registrar, but the overall process should be similar. The following steps will demonstrate the process for a domain registered via Namecheap. If you are using a different registrar, please refer to their respective documentation.
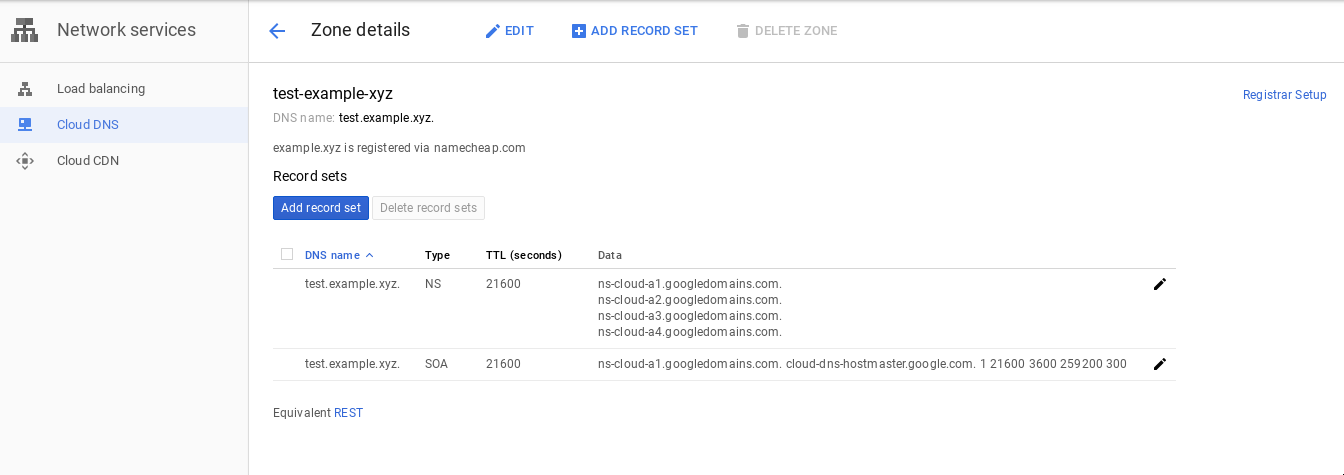
Create a Google Cloud DNS zone
Open Google Cloud Console and navigate to Networing > Network Services > Cloud DNS. Then create a Google Cloud DNS zone for your domain, like so:
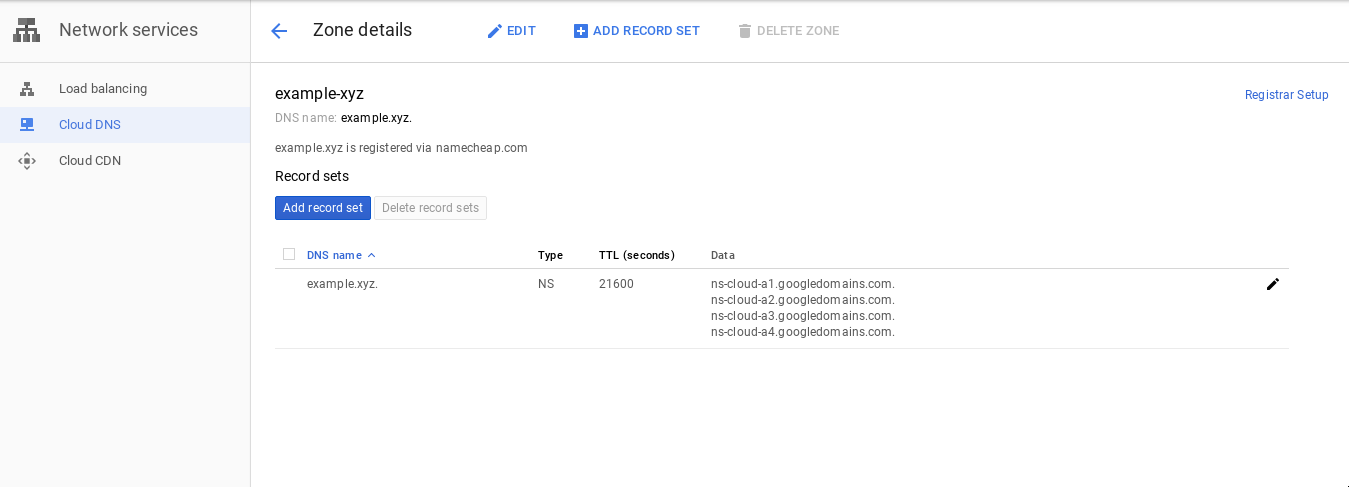
Note the nameservers listed in the NS record.
ns-cloud-a1.googledomains.com.
ns-cloud-a2.googledomains.com.
ns-cloud-a3.googledomains.com.
ns-cloud-a4.googledomains.com.
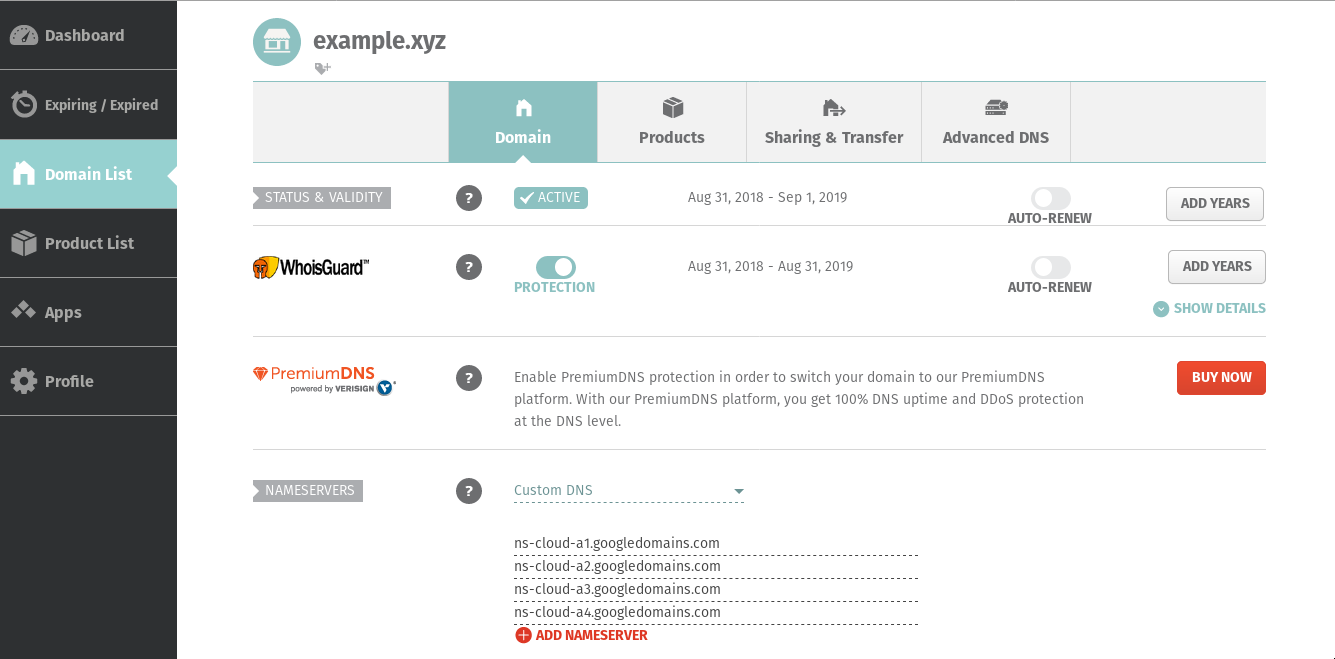
Change registrar’s nameservers
Go to your domain’s management page and change the nameservers to use the ones listed in your Google Cloud DNS zone.
Wait and verify that the nameserver change have propagated
Use dig to check if the nameserver change have propagated. Note that
propagation could take up to 48 hours in some cases. (I
$ dig NS example.xyz

; <<>> DiG 9.10.8-P1 <<>> NS example.xyz
;; global options: +cmd
;; Got answer:
;; ->>HEADER<<- opcode: QUERY, status: NOERROR, id: 46281
;; flags: qr rd ra; QUERY: 1, ANSWER: 4, AUTHORITY: 0, ADDITIONAL: 9

;; OPT PSEUDOSECTION:
; EDNS: version: 0, flags:; udp: 4096
;; QUESTION SECTION:
;example.xyz.                        IN      NS

;; ANSWER SECTION:
example.xyz.         3600    IN      NS      ns-cloud-a3.googledomains.com.
example.xyz.         3600    IN      NS      ns-cloud-a2.googledomains.com.
example.xyz.         3600    IN      NS      ns-cloud-a4.googledomains.com.
example.xyz.         3600    IN      NS      ns-cloud-a1.googledomains.com.
Change the LoadBalancer’s External IP address to static
Next is to change the external IP that was generated for the
ingress-nginx LoadBalancer to a static one so it does not change.
Open Google Cloud Console again and go to Networking > VPC Network >
External IP addresses. Look for the correct external IP address and
change its type from Ephemeral to Static.
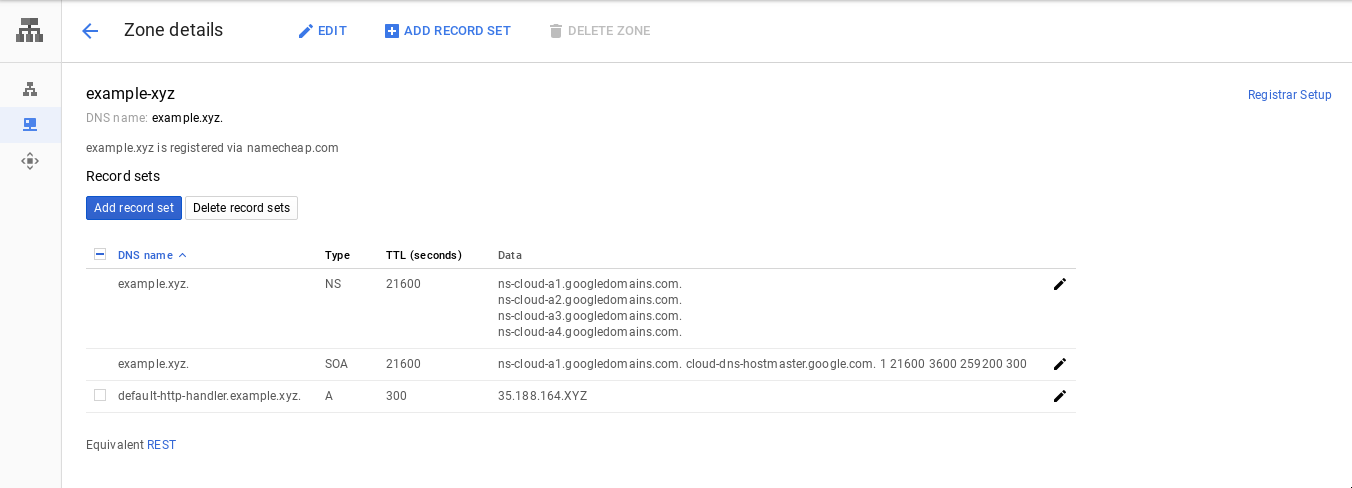
Add the A record
Now that we have a static IP address and the domain nameservers are configured and propagated, we can add the A record for the default HTTP backend.
Go to your Google Cloud DNS zone and add an A record for your
subdomain of choice using the external IP address of the
ingress-nginx LoadBalancer Service.
Here we are using default-http-backend.example.xyz for the
subdomain.
Wait for about 5 minutes for the changes to propagate, and verify with
dig.
$ dig A default-http-backend.example.xyz

; <<>> DiG 9.10.8-P1 <<>> A default-http-backend.example.xyz
;; global options: +cmd
;; Got answer:
;; ->>HEADER<<- opcode: QUERY, status: NOERROR, id: 29003
;; flags: qr rd ra; QUERY: 1, ANSWER: 1, AUTHORITY: 4, ADDITIONAL: 9

;; OPT PSEUDOSECTION:
; EDNS: version: 0, flags:; udp: 4096
;; QUESTION SECTION:
;default-http-backend.example.xyz. IN        A

;; ANSWER SECTION:
default-http-backend.example.xyz. 300 IN A   35.188.164.XYZ

;; AUTHORITY SECTION:
example.xyz.         1948    IN      NS      ns-cloud-a2.googledomains.com.
example.xyz.         1948    IN      NS      ns-cloud-a4.googledomains.com.
example.xyz.         1948    IN      NS      ns-cloud-a1.googledomains.com.
example.xyz.         1948    IN      NS      ns-cloud-a3.googledomains.com.

;; ADDITIONAL SECTION:
ns-cloud-a1.googledomains.com. 282117 IN A      216.239.32.106
ns-cloud-a1.googledomains.com. 83626 IN AAAA    2001:4860:4802:32::6a
ns-cloud-a2.googledomains.com. 282117 IN A      216.239.34.106
ns-cloud-a2.googledomains.com. 83626 IN AAAA    2001:4860:4802:34::6a
ns-cloud-a3.googledomains.com. 289144 IN A      216.239.36.106
ns-cloud-a3.googledomains.com. 83626 IN AAAA    2001:4860:4802:36::6a
ns-cloud-a4.googledomains.com. 273375 IN A      216.239.38.106
ns-cloud-a4.googledomains.com. 83626 IN AAAA    2001:4860:4802:38::6a

;; Query time: 274 msec
;; SERVER: 208.91.112.53#53(208.91.112.53)
;; WHEN: Wed Sep 26 15:03:39 +08 2018
;; MSG SIZE  rcvd: 377
And try accessing the default backend via its new domain.
$ curl http://default-http-backend.example.xyz -i
HTTP/1.1 404 Not Found
Server: nginx/1.15.3
Date: Wed, 26 Sep 2018 07:07:25 GMT
Content-Type: text/plain; charset=utf-8
Content-Length: 21
Connection: keep-alive

default backend - 404
Add a wildcard subdomain record for the wildcard-demo app
Now that we are able to access the default HTTP backend via a domain
address, we want to be able to do the same for our wildcard-demo app.
We want http://wildcard-demo.example.xyz or
http://foo.wildcard-demo.example.xyz to point to the wildcard-demo
app.
Create an Ingress for the wildcard-demo app
Apply the following resource.
apiVersion: extensions/v1beta1
kind: Ingress
metadata:
  name: wildcard-demo-ingress
  namespace: wildcard-demo
  annotations:
    kubernetes.io/ingress.class: "nginx"
spec:
  rules:
    - host: wildcard-demo.example.xyz
      http:
        paths:
          - path: /
            backend:
              serviceName: wildcard-demo
              servicePort: http
    - host: "*.wildcard-demo.example.xyz"
      http:
        paths:
          - path: /
            backend:
              serviceName: wildcard-demo
              servicePort: http
Then confirm its creation:
$ kubectl get ingress --namespace=wildcard-demo
NAME                    HOSTS                                                         ADDRESS         PORTS     AGE
wildcard-demo-ingress   wildcard-demo.example.xyz,*.wildcard-demo.example.xyz         35.188.164.XYZ  80        2m
We are not yet able to access the new Ingress at this point, since the hosts do not have a record in our DNS zone yet and the IP address will be routed to the default HTTP backend.
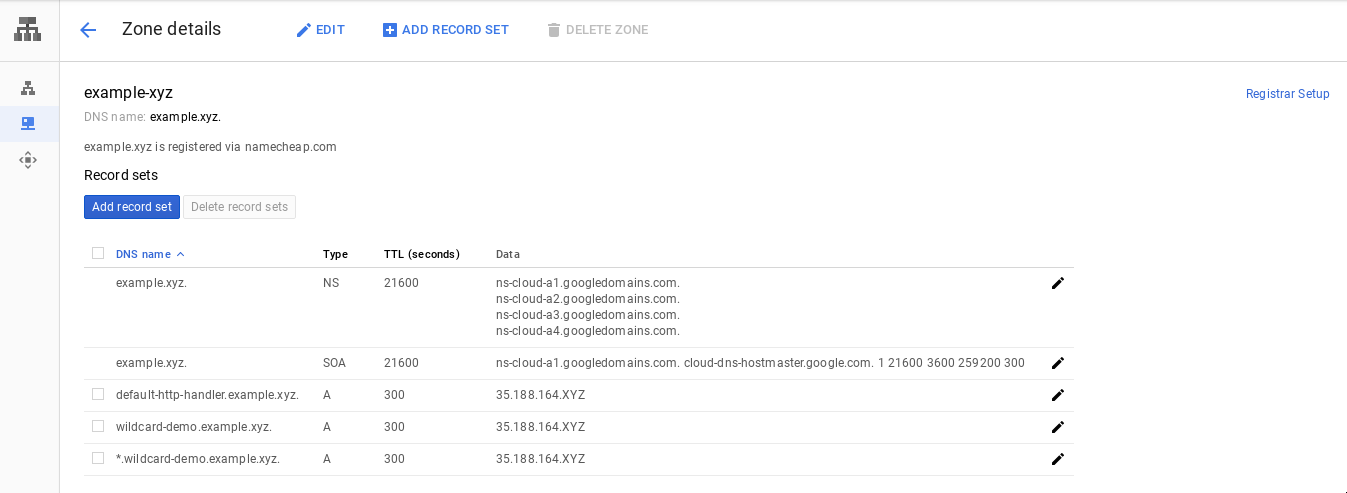
Add the A records for wildcard-demo
We need to add A records in our Google Cloud DNS zone, one for each of the hosts we specified in the new Ingress. Use the same external IP address for both A records.
Wait for another 5 minutes, and verify with dig again.
$ dig A wildcard-demo.example.xyz

; <<>> DiG 9.10.8-P1 <<>> A wildcard-demo.example.xyz
;; global options: +cmd
;; Got answer:
;; ->>HEADER<<- opcode: QUERY, status: NOERROR, id: 782
;; flags: qr rd ra; QUERY: 1, ANSWER: 1, AUTHORITY: 4, ADDITIONAL: 9

;; OPT PSEUDOSECTION:
; EDNS: version: 0, flags:; udp: 4096
;; QUESTION SECTION:
;wildcard-demo.example.xyz.  IN      A

;; ANSWER SECTION:
wildcard-demo.example.xyz. 300 IN    A       35.188.164.XYZ

...truncated...

$ dig A foo.wildcard-demo.example.xyz

; <<>> DiG 9.10.8-P1 <<>> A foo.wildcard-demo.example.xyz
;; global options: +cmd
;; Got answer:
;; ->>HEADER<<- opcode: QUERY, status: NOERROR, id: 18034
;; flags: qr rd ra; QUERY: 1, ANSWER: 1, AUTHORITY: 4, ADDITIONAL: 9

;; OPT PSEUDOSECTION:
; EDNS: version: 0, flags:; udp: 4096
;; QUESTION SECTION:
;foo.wildcard-demo.example.xyz. IN   A

;; ANSWER SECTION:
foo.wildcard-demo.example.xyz. 300 IN A      35.188.164.XYZ

...truncated...
And finally test the new domain by accessing it.
$ curl http://wildcard-demo.example.xyz -i
HTTP/1.1 200 OK
Server: nginx/1.15.3
Date: Wed, 26 Sep 2018 07:26:11 GMT
Content-Type: text/plain
Content-Length: 217
Connection: keep-alive

remote address: 10.8.0.10
x-forwarded-for: 128.106.194.22
hostname: wildcard-demo.example.xyz
pod ip: 10.8.1.8
pod name: wildcard-demo-76dd957877-8cx7w
node name: gke-wildcard-demo--default-pool-e14a69d3-1t2m

$ curl http://foo.wildcard-demo.example.xyz -i
HTTP/1.1 200 OK
Server: nginx/1.15.3
Date: Wed, 26 Sep 2018 07:27:56 GMT
Content-Type: text/plain
Content-Length: 221
Connection: keep-alive

remote address: 10.8.0.10
x-forwarded-for: 128.106.194.22
hostname: foo.wildcard-demo.example.xyz
pod ip: 10.8.0.8
pod name: wildcard-demo-76dd957877-84jqb
node name: gke-wildcard-demo--default-pool-e14a69d3-br0l
Note the X-Forwarded-For request header being set by
ingress-nginx.
What we have so far
At this point we have the following additional pieces working:
- An Ingress for the wildcard demo app.
- A domain configured to use Google Cloud DNS nameservers.
- A static external IP address for
ingress-nginx. The following A records in our Google Cloud DNS Zone:
default-http-backend.example.xyz. A    35.188.164.XYZ
wildcard-demo.example.xyz.        A    35.188.164.XYZ
*.wildcard-demo.example.xyz.      A    35.188.164.XYZ
Now that we are able to access are Services via their domain addresses, we are ready to request SSL certificates for them.
Installing cert-manager on the cluster
cert-manager is one of the more recent iterations for managing
certificates on Kubernetes.
The recommended way to install cert-manager is via Helm, but that is beyond the scope of this guide so we defer to cert-manager’s and/or Helm’s official guides to install. Note that cert-manager also has instructions on installing using static manifests. Whichever method you follow to install, make sure you choose the one which uses RBAC.
Verifying your cert-manager install
By default, cert-manager will be installed in its own Namespace called
cert-manager.
$ kubectl get deployment --namespace=cert-manager
NAME           DESIRED   CURRENT   UP-TO-DATE   AVAILABLE   AGE
cert-manager   1         1         1            1           1m
Acquiring a “staging” certificate for ingress-nginx’s default HTTP backend
Before we attempt acquiring valid certificates, it’s a good idea to try acquiring staging certificates first. This way we can debug any issues we run into without worrying about Let’s Encrypts rate limits.
Create a Google Cloud service account for managing Cloud DNS resources
In order for cert-manager to validate a domain via DNS-01 challenge,
it needs to be able to add a TXT record to your Cloud DNS zone. We
can authorize cert-manager to do this by creating a Google Cloud
service account and storing it in a Secret.
Go to your Google Cloud Console and navigate to IAM & Admin > Service accounts. From there, create a new service account, assigning it a recognizable name and grant it access to the “DNS Administrator” role. When prompted to download the key, do so in the JSON format and save it to a file.
Now we need to upload the key stored in the JSON file in a Secret in
the Namespace where the Issuer resource will be created
(ingress-nginx in this case).
$ kubectl create secret generic clouddns-service-account --from-file=service-account-key.json=/path/to/example-project-1a2bc3456789.json --namespace=ingress-nginx
secret "clouddns-service-account" created

$ kubectl describe secret clouddns-service-account --namespace=ingress-nginx
Name:         clouddns-service-account
Namespace:    ingress-nginx
Labels:       <none>
Annotations:  <none>

Type:  Opaque

Data
====
service-account-key.json:  2336 bytes
Create Issuer in ingress-nginx Namespace
An Issuer is a resource that issues certificates in a single Namespace. There’s also a ClusterIssuer that can issue certificates across different Namespaces, but for this guide we will only use Issuer.
The following manifest creates an Issuer in the ingress-nginx
Namespace and uses Let’s Encrypt’s staging API to request the
certificates via a DNS-01 challenge using Google Cloud DNS as the
provider.
apiVersion: certmanager.k8s.io/v1alpha1
kind: Issuer
metadata:
  name: letsencrypt-staging
  namespace: ingress-nginx
spec:
  acme:
    server: https://acme-staging-v02.api.letsencrypt.org/directory
    email: john@example.xyz

    # Name of a secret used to store the ACME account private key
    privateKeySecretRef:
      name: letsencrypt-staging

    # ACME DNS-01 provider configurations
    dns01:

      # Here we define a list of DNS-01 providers that can solve DNS challenges
      providers:
        - name: clouddns
          clouddns:
            # A secretKeyRef to a google cloud json service account
            serviceAccountSecretRef:
              name: clouddns-service-account
              key: service-account-key.json
            # The Google Cloud project in which to update the DNS zone
            project: example-project
Create Certificate resource
Once we have an Issuer we can create a Certificate.
apiVersion: certmanager.k8s.io/v1alpha1
kind: Certificate
metadata:
  name: default-http-backend-example-xyz-staging
  namespace: ingress-nginx
spec:
  secretName: default-http-backend-example-xyz-staging-tls
  issuerRef:
    name: letsencrypt-staging
    kind: Issuer
  commonName: default-http-backend.example.xyz
  dnsNames:
    - default-http-backend.example.xyz
  acme:
    config:
      - dns01:
          provider: clouddns
        domains:
          - default-http-backend.example.xyz
After a couple of minutes, the staging Certificate should be issued
and stored in the Secret specified in the secretName specified
above.
$ kubectl describe certificate default-http-backend-example-xyz-staging --namespace=ingress-nginx
Name:         default-http-backend-example-xyz-staging
Namespace:    ingress-nginx
Labels:       <none>
Annotations:  <truncated>
API Version:  certmanager.k8s.io/v1alpha1
Kind:         Certificate
Metadata:
  <truncated>
Spec:
  Acme:
    Config:
      Dns 01:
        Provider:  clouddns
      Domains:
        default-http-backend.example.xyz
  Common Name:  default-http-backend.example.xyz
  Dns Names:
    default-http-backend.example.xyz
  Issuer Ref:
    Kind:       Issuer
    Name:       letsencrypt-staging
  Secret Name:  default-http-backend-example-xyz-staging-tls
Status:
  Acme:
    Order:
      URL:  https://acme-staging-v02.api.letsencrypt.org/acme/order/7012226/8989674
  Conditions:
    Last Transition Time:  2018-09-26T12:44:31Z
    Message:               Certificate issued successfully
    Reason:                CertIssued
    Status:                True
    Type:                  Ready
    Last Transition Time:  <nil>
    Message:               Order validated
    Reason:                OrderValidated
    Status:                False
    Type:                  ValidateFailed
Events:
  Type    Reason          Age   From          Message
  ----    ------          ----  ----          -------
  Normal  CreateOrder     8m    cert-manager  Created new ACME order, attempting validation...
  Normal  DomainVerified  6m    cert-manager  Domain "default-http-backend.example.xyz" verified with "dns-01" validation
  Normal  IssueCert       6m    cert-manager  Issuing certificate...
  Normal  CertObtained    6m    cert-manager  Obtained certificate from ACME server
  Normal  CertIssued      6m    cert-manager  Certificate issued successfully
Use the Certificate in the default HTTP backend Ingress
We now have a TLS certificate stored in the
default-http-backend-example-xyz-staging-tls Secret. Create a new
Ingress for the default HTTP backend and use the certificate.
apiVersion: extensions/v1beta1
kind: Ingress
metadata:
  name: default-http-backend-ingress
  namespace: ingress-nginx
  annotations:
    kubernetes.io/ingress.class: "nginx"
spec:
  tls:
    - secretName: default-http-backend-example-xyz-staging-tls
      hosts:
        - default-http-backend.example.xyz
  rules:
    - host: default-http-backend.example.xyz
      http:
        paths:
          - path: /
            backend:
              serviceName: default-http-backend
              servicePort: 80
Now when we access the default backend via http, we get a 308
Permanent Redirect to the https version thanks to ingress-nginx.
$ curl http://default-http-backend.example.xyz -i
HTTP/1.1 308 Permanent Redirect
Server: nginx/1.15.3
Date: Fri, 28 Sep 2018 01:51:39 GMT
Content-Type: text/html
Content-Length: 187
Connection: keep-alive
Location: https://default-http-backend.example.xyz/

<html>
<head><title>308 Permanent Redirect</title></head>
<body bgcolor="white">
<center><h1>308 Permanent Redirect</h1></center>
<hr><center>nginx/1.15.3</center>
</body>
</html>
Accessing via https gives us the familiar 404 response. Note the
-k flag to disable SSL validation, since the staging certificates
are not valid.
$ curl https://default-http-backend.example.xyz -i -k
HTTP/1.1 404 Not Found
Server: nginx/1.15.3
Date: Fri, 28 Sep 2018 01:54:10 GMT
Content-Type: text/plain; charset=utf-8
Content-Length: 21
Connection: keep-alive
Strict-Transport-Security: max-age=15724800; includeSubDomains

default backend - 404
Acquiring a “staging” wildcard certificate for the wildcard-demo app
The process is similar for wildcard certificates. First we create an
Issuer in the wildcard-demo Namespace, then create the Certificate,
and finally use the certificate in the Ingress.
Create Issuer in wildcard-demo Namespace
First we need to create the Secret to store the Cloud DNS service account key
in the wildcard-demo Namespace.
$ kubectl create secret generic clouddns-service-account --from-file=service-account-key.json=/path/to/example-project-1a2bc3456789.json --namespace=wildcard-demo
secret "clouddns-service-account" created

$ kubectl describe secret clouddns-service-account --namespace=ingress-nginx
Name:         clouddns-service-account
Namespace:    wildcard-demo
Labels:       <none>
Annotations:  <none>

Type:  Opaque

Data
====
service-account-key.json:  2336 bytes
Then create the Issuer.
apiVersion: certmanager.k8s.io/v1alpha1
kind: Issuer
metadata:
  name: letsencrypt-staging
  namespace: wildcard-demo
spec:
  acme:
    server: https://acme-staging-v02.api.letsencrypt.org/directory
    email: john@example.xyz

    # Name of a secret used to store the ACME account private key
    privateKeySecretRef:
      name: letsencrypt-staging

    # ACME DNS-01 provider configurations
    dns01:

      # Here we define a list of DNS-01 providers that can solve DNS challenges
      providers:
        - name: clouddns
          clouddns:
            # A secretKeyRef to a google cloud json service account
            serviceAccountSecretRef:
              name: clouddns-service-account
              key: service-account-key.json
            # The Google Cloud project in which to update the DNS zone
            project: example-project
Create Certificate resource
apiVersion: certmanager.k8s.io/v1alpha1
kind: Certificate
metadata:
  name: wildcard-demo-example-xyz-staging
  namespace: wildcard-demo
spec:
  secretName: wildcard-demo-example-xyz-staging-tls
  issuerRef:
    name: letsencrypt-staging
    kind: Issuer
  commonName: wildcard-demo.example.xyz
  dnsNames:
    - wildcard-demo.example.xyz
    - "*.wildcard-demo.example.xyz"
  acme:
    config:
      - dns01:
          provider: clouddns
        domains:
          - wildcard-demo.example.xyz
          - "*.wildcard-demo.example.xyz"
Validating wildcard certificates takes longer, so wait a couple of minutes and check its status.
$ kubectl describe certificate wildcard-demo-example-xyz-staging --namespace=wildcard-demo
Name:         wildcard-demo-example-xyz-staging
Namespace:    wildcard-demo
API Version:  certmanager.k8s.io/v1alpha1
Kind:         Certificate
Metadata:
  <truncated>
Spec:
  Acme:
    Config:
      Dns 01:
        Provider:  clouddns
      Domains:
        wildcard-demo.example.xyz
        *.wildcard-demo.example.xyz
  Common Name:  wildcard-demo.example.xyz
  Dns Names:
    wildcard-demo.example.xyz
    *.wildcard-demo.example.xyz
  Issuer Ref:
    Kind:       Issuer
    Name:       letsencrypt-staging
  Secret Name:  wildcard-demo-example-xyz-staging-tls
Status:
  Acme:
    Order:
      URL:  https://acme-staging-v02.api.letsencrypt.org/acme/order/7022259/9120998
  Conditions:
    Last Transition Time:  2018-09-28T02:13:13Z
    Message:               Certificate issued successfully
    Reason:                CertIssued
    Status:                True
    Type:                  Ready
    Last Transition Time:  <nil>
    Message:               Order validated
    Reason:                OrderValidated
    Status:                False
    Type:                  ValidateFailed
Events:
  Type    Reason          Age              From          Message
  ----    ------          ----             ----          -------
  Normal  CreateOrder     7m               cert-manager  Created new ACME order, attempting validation...
  Normal  DomainVerified  1m (x2 over 4m)  cert-manager  Domain "wildcard-demo.example.xyz" verified with "dns-01" validation
  Normal  IssueCert       1m               cert-manager  Issuing certificate...
  Normal  CertObtained    1m               cert-manager  Obtained certificate from ACME server
  Normal  CertIssued      1m               cert-manager  Certificate issued successfully
Use the Certificate in the wildcard-demo Ingress
Finally, update the wildcard-demo Ingress to use the new certificate.
apiVersion: extensions/v1beta1
kind: Ingress
metadata:
  name: wildcard-demo-ingress
  namespace: wildcard-demo
  annotations:
    kubernetes.io/ingress.class: "nginx"
spec:
  tls:
    - secretName: wildcard-demo-example-xyz-staging-tls
      hosts:
        - wildcard-demo.example.xyz
        - "*.wildcard-demo.example.xyz"
  rules:
    - host: wildcard-demo.example.xyz
      http:
        paths:
          - path: /
            backend:
              serviceName: wildcard-demo
              servicePort: http
    - host: "*.wildcard-demo.example.xyz"
      http:
        paths:
          - path: /
            backend:
              serviceName: wildcard-demo
              servicePort: http
Now we can access the app via https.
$ curl https://wildcard-demo.example.xyz -i -k
HTTP/1.1 200 OK
Server: nginx/1.15.3
Date: Fri, 28 Sep 2018 02:20:08 GMT
Content-Type: text/plain
Content-Length: 217
Connection: keep-alive
Strict-Transport-Security: max-age=15724800; includeSubDomains

remote address: 10.8.0.10
x-forwarded-for: 222.164.248.27
hostname: wildcard-demo.example.xyz
pod ip: 10.8.1.8
pod name: wildcard-demo-76dd957877-8cx7w
node name: gke-wildcard-demo--default-pool-e14a69d3-1t2m


$ curl https://foo.wildcard-demo.example.xyz -i -k
HTTP/1.1 200 OK
Server: nginx/1.15.3
Date: Fri, 28 Sep 2018 02:20:08 GMT
Content-Type: text/plain
Content-Length: 217
Connection: keep-alive
Strict-Transport-Security: max-age=15724800; includeSubDomains

remote address: 10.8.0.10
x-forwarded-for: 222.164.248.27
hostname: foo.wildcard-demo.example.xyz
pod ip: 10.8.1.8
pod name: wildcard-demo-76dd957877-8cx7w
node name: gke-wildcard-demo--default-pool-e14a69d3-1t2m
Switching to valid Let’s Encrypt certificates
We’re almost done. We now have a working Issuer that we know doesn’t run into issues when requesting for certificates from Let’s Encrypt, and so it is safe to switch to using Let’s Encrypt’s production API’s.
The process will be similar to how we got the staging certificates. First we need to create an Issuer in the Namespace that needs it, but this time the Issuer will be configured to use Let’s Encrypt’s production API. Then we create new Certificates using the production Issuer, and finally update the Ingresses to use the production Certificates.
Create production Issuers
For brevity, we will combine the two Issuers into one manifest file.
apiVersion: certmanager.k8s.io/v1alpha1
kind: Issuer
metadata:
  name: letsencrypt
  namespace: ingress-nginx
spec:
  acme:
    server: https://acme-v02.api.letsencrypt.org/directory
    email: john@example.xyz

    # Name of a secret used to store the ACME account private key
    privateKeySecretRef:
      name: letsencrypt

    # ACME DNS-01 provider configurations
    dns01:

      # Here we define a list of DNS-01 providers that can solve DNS challenges
      providers:
        - name: clouddns
          clouddns:
            # A secretKeyRef to a google cloud json service account
            serviceAccountSecretRef:
              name: clouddns-service-account
              key: service-account-key.json
            # The Google Cloud project in which to update the DNS zone
            project: example-project
---
apiVersion: certmanager.k8s.io/v1alpha1
kind: Issuer
metadata:
  name: letsencrypt
  namespace: wildcard-demo
spec:
  acme:
    server: https://acme-v02.api.letsencrypt.org/directory
    email: john@example.xyz

    # Name of a secret used to store the ACME account private key
    privateKeySecretRef:
      name: letsencrypt

    # ACME DNS-01 provider configurations
    dns01:

      # Here we define a list of DNS-01 providers that can solve DNS challenges
      providers:
        - name: clouddns
          clouddns:
            # A secretKeyRef to a google cloud json service account
            serviceAccountSecretRef:
              name: clouddns-service-account
              key: service-account-key.json
            # The Google Cloud project in which to update the DNS zone
            project: example-project
Create production Certificates
apiVersion: certmanager.k8s.io/v1alpha1
kind: Certificate
metadata:
  name: default-http-backend-example-xyz
  namespace: ingress-nginx
spec:
  secretName: default-http-backend-example-xyz-tls
  issuerRef:
    name: letsencrypt
    kind: Issuer
  commonName: default-http-backend.example.xyz
  dnsNames:
    - default-http-backend.example.xyz
  acme:
    config:
      - dns01:
          provider: clouddns
        domains:
          - default-http-backend.example.xyz
---
apiVersion: certmanager.k8s.io/v1alpha1
kind: Certificate
metadata:
  name: wildcard-demo-example-xyz
  namespace: wildcard-demo
spec:
  secretName: wildcard-demo-example-xyz-tls
  issuerRef:
    name: letsencrypt
    kind: Issuer
  commonName: wildcard-demo.example.xyz
  dnsNames:
    - wildcard-demo.example.xyz
    - "*.wildcard-demo.example.xyz"
  acme:
    config:
      - dns01:
          provider: clouddns
        domains:
          - wildcard-demo.example.xyz
          - "*.wildcard-demo.example.xyz"
Use the new Certificates in our Ingresses
apiVersion: extensions/v1beta1
kind: Ingress
metadata:
  name: default-http-backend-ingress
  namespace: ingress-nginx
  annotations:
    kubernetes.io/ingress.class: "nginx"
spec:
  tls:
    - secretName: default-http-backend-example-xyz-tls
      hosts:
        - default-http-backend.example.xyz
  rules:
    - host: default-http-backend.example.xyz
      http:
        paths:
          - path: /
            backend:
              serviceName: default-http-backend
              servicePort: 80
---
apiVersion: extensions/v1beta1
kind: Ingress
metadata:
  name: wildcard-demo-ingress
  namespace: wildcard-demo
  annotations:
    kubernetes.io/ingress.class: "nginx"
spec:
  tls:
    - secretName: wildcard-demo-example-xyz-tls
      hosts:
        - wildcard-demo.example.xyz
        - "*.wildcard-demo.example.xyz"
  rules:
    - host: wildcard-demo.example.xyz
      http:
        paths:
          - path: /
            backend:
              serviceName: wildcard-demo
              servicePort: http
    - host: "*.wildcard-demo.example.xyz"
      http:
        paths:
          - path: /
            backend:
              serviceName: wildcard-demo
              servicePort: http
After applying the manifests above, we should now be able to access
our backends via https, and this time their certificates will be
valid.
$ curl https://default-http-backend.example.xyz -i
HTTP/1.1 404 Not Found
Server: nginx/1.15.3
Date: Fri, 28 Sep 2018 06:40:10 GMT
Content-Type: text/plain; charset=utf-8
Content-Length: 21
Connection: keep-alive
Strict-Transport-Security: max-age=15724800; includeSubDomains

default backend - 404

$ curl https://foo.wildcard-demo.example.xyz -i
HTTP/1.1 200 OK
Server: nginx/1.15.3
Date: Fri, 28 Sep 2018 06:40:56 GMT
Content-Type: text/plain
Content-Length: 221
Connection: keep-alive
Strict-Transport-Security: max-age=15724800; includeSubDomains

remote address: 10.8.0.10
x-forwarded-for: 128.106.194.70
hostname: foo.wildcard-demo.example.xyz
pod ip: 10.8.1.8
pod name: wildcard-demo-76dd957877-8cx7w
node name: gke-wildcard-demo--default-pool-e14a69d3-1t2m
What we have so far
cert-manager(v0.5.0 at the time of writing) deployed to its own Namespace- The following
cert-managerresources in theingress-nginxNamespace- Issuer
- Certificate (which in turn creates a Secret where the certificate key itself is stored)
- The following
cert-managerresources in thewildcard-demoNamespace- Issuer
- Certificate (which in turn creates a Secret where the certificate key itself is stored)
- Ingresses with their
tlsconfigured
Cleanup
Before we finish, we should delete the staging Certificates we acquired earlier. If you don’t plan on using the staging Issuer again in the Namespace, go ahead and delete that as well.
$ kubectl delete certificate default-http-backend-example-xyz-staging --namespace=ingress-nginx
certificate.certmanager.k8s.io "default-http-backend-example-xyz-staging" deleted

$ kubectl delete certificate wildcard-demo-example-xyz-staging --namespace=wildcard-demo
certificate.certmanager.k8s.io "wildcard-demo-example-xyz-staging" deleted

$ kubectl delete issuer letsencrypt-staging --namespace=ingress-nginx
issuer.certmanager.k8s.io "letsencrypt-staging" deleted

$ kubectl delete issuer letsencrypt-staging --namespace=wildcard-demo
issuer.certmanager.k8s.io "letsencrypt-staging" deleted
Next steps
I hope this guide helps clarify some of the confusion around how to set up wildcard certificates with the Nginx Ingress controller.
A good exercise to go on from here would be to automate the process
that was covered. It would be great if getting a new wildcard-demo
instance in a separate Namespace, with its own subdomain and
certificates automatically.
If you would like to learn more about the details of the various pieces at work, here are some links:
- ingress-nginx
- official documentation
- https://kubernetes.github.io/ingress-nginx/
- cert-manager
- official documentation
- https://cert-manager.readthedocs.io/en/latest/
- using with ingress-nginx
- https://cert-manager.readthedocs.io/en/latest/tutorials/acme/securing-nginx-ingress-with-letsencrypt.html
- issuing certificates with DNS validation
- https://cert-manager.readthedocs.io/en/latest/tutorials/acme/dns-validation.html
- Issuer reference
- https://cert-manager.readthedocs.io/en/latest/reference/issuers.html
- ClusterIssuer reference
- https://cert-manager.readthedocs.io/en/latest/reference/clusterissuers.html
- Let’s Encrypt
- official documentation
- https://letsencrypt.org/docs/
- staging environment
- https://letsencrypt.org/docs/staging-environment/
- DNS-01 validation
- https://docs.certifytheweb.com/docs/dns-validation.html
Issues
Here are some of the issues I ran into while doing my own tests for this guide. These issues are probably just caused by mistakes on my part, but I’m listing them here in case someone finds them helpful.
cert-manager did not work when I tried a DNS zone for a subdomain instead of the domain
In my first attempt at creating the Cloud DNS zone, I didn’t want to mix the test domains which will be created from this guide with my other active domains, and so I created a separate DNS zone for my test subdomain.
This didn’t play well with Let’s Encrypt’s verification process and so
cert-manager’s Issuers couldn’t acquire certificates.
I ended up deleting the extra DNS zone and just used the main DNS zone for my domain.
This is a known issue.
Might need to modify cert-manager’s Deployment args to use dns01-self-check-nameservers
Another issue I ran into was with the DNS nameserver change not having
been fully propagated yet when I started acquiring certificates. What
added to the confusion was that when I ran dig on my machines, the
DNS was good. But when checking cert-manager’s logs, I could see
that it had trouble resolving my domains. I suspect this was due to
not waiting at least 48 hours for the DNS changes to fully propagate.
I was getting impatient at the time and so I ended up modifying
cert-manager’s Deployment manifest and adding the
--dns01-self-check-nameservers parameter to its container command.
...
spec:
  containers:
  - args:
    - --cluster-resource-namespace=$(POD_NAMESPACE)
    - --leader-election-namespace=$(POD_NAMESPACE)
    - --dns01-self-check-nameservers="1.1.1.1;53,8.8.8.8:53"  # add this
...